WP-CLI, or WordPress Command Line Interface, is a powerful tool that allows you to manage your WordPress site directly from the command line, bypassing the backend dashboard.
With WP-CLI, you can easily carry out various tasks, such as installing themes and plugins, managing user accounts, and adjusting settings. This offers a convenient alternative to the standard WordPress admin interface.
One of the biggest advantages of using WP-CLI is the speed it brings to site management; instead of clicking through buttons and navigating multiple pages, you can quickly execute commands to accomplish your goals.
What Are the Requirements for Setting Up WP-CLI?
One of the benefits of utilizing WP-CLI is the ability to access your site’s settings without relying on a web browser. However, before installing WP-CLI on your computer, there are several prerequisites to fulfill.
Firstly, your WordPress hosting provider needs to support SSH (Secure Shell) access. SSH is a secure protocol that enables your computer to connect to your WordPress site via a command line interface.
Additionally, here are a few other requirements for using WP-CLI: PHP version 5.6 or higher, WordPress version 3.7 or later, and SSH software.
How to Install WP-CLI on Your Computer and Hosting Provider
Nowadays, most computers have SSH software already installed. For example, Mac users can utilize Terminal, while Windows users can use PowerShell with OpenSSH.
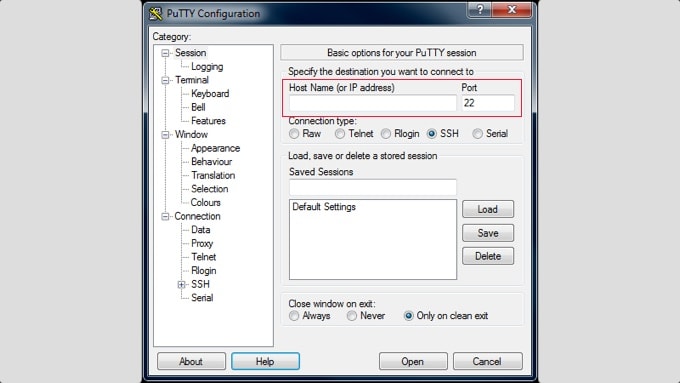
However, we suggest trying an open-source, free program called PuTTY. To get started, simply visit the PuTTY website to download the application.

Next, you can install the software on your computer and launch it.
From here, you will need to enter the Host Name (IP address) and port number. Once that’s done, click the ‘Open’ button.

Following that, a terminal window will appear where you can input your username and password to access your WordPress website.
You can locate your username, password, IP address, and port number in your hosting provider’s cPanel. If you’re unable to find this information, we recommend contacting customer support for assistance.
Additionally, WP-CLI must be installed on your web hosting server. Most hosting providers, such as Bluehost, include WP-CLI by default. However, if WP-CLI is not pre-installed, you can download the wp-cli.phar file using the following command:
curl -O https://raw.githubusercontent.com/wp-cli/builds/gh-pages/phar/wp-cli.phar
For more details, please see the installation guide provided by WordPress.org for setting up WP-CLI.
How Can You Use WP-CLI in WordPress?
Once you’ve set up WP-CLI on both your computer and server, you can start managing your website efficiently.
For example, it allows you to install, activate, and deactivate WordPress plugins and themes with ease.
Additionally, WP-CLI provides functionalities for updating the WordPress core files, handling comments, clearing the cache, managing language packs, creating backups, modifying WordPress settings, and much more.
A significant advantage is that the command line interface can assist in troubleshooting your website if you encounter issues and cannot access the admin panel.
In such cases, you can disable problematic plugins or adjust settings via the command line to restore normal operation. To get started with WP-CLI, here are some common commands you can use to manage your site:
- wp core download – You can use this command to download WordPress.
- wp core install – Enter this command to install WordPress.
- wp core version – Check the WordPress version and ensure WordPress was successfully installed.
- wp plugin install [plugin-name] – Run this command to install a plugin on your site (replace ‘plugin-name’ with the name of the WordPress plugin, like wpforms-lite).
- wp plugin activate [plugin-name] – After installing the plugin, simply use this command to activate the plugin.
- wp theme install [theme-name] – This command is for installing a WordPress theme (don’t forget to replace ‘theme-name’ with the theme you want to use).
- wp theme activate [theme-name] – Simply enter this command to activate a WordPress theme.
- wp user create – Create a new user with this command.
- wp user add-role user ID role – This command lets you add a role for a user (just enter the user ID and the role you want to assign).
- wp admin – For opening the WordPress admin panel in a browser.
We trust that this article has enhanced your understanding of WP-CLI in WordPress.
For further insights, be sure to check out our Additional Reading list below, which features articles on valuable WordPress tips, tricks, and ideas.
If you found this article helpful, consider subscribing to our YouTube Channel for WordPress video tutorials. Connect with us on Twitter and Facebook for more updates!


